Tuesday, January 18, 2011

Quick & Easy Sugar Cookies for a Blustery Day

Time: About 30 minutes
Servings: About 25 cookies
Overall Rating: 6

I know I said my next recipe would be Macadamia-Encrusted Seitan, but that will still come next. I'm stuck home in yet another snowstorm (check out Twitter hashtag #snowhampshire), and my dog Cotton and I got a case of cabin fever this afternoon. We decided to bake something. Because a trip to the store would be difficult with the current road conditions, I figured sugar cookies would be simple enough to make with what I already had in the house.

A quick Google search yielded a Simple Vegan Sugar Cookies recipe on GroupRecipes.com. The only ingredient I didn't have was egg replacer, so I used 2 tablespoons of soy milk instead. See this article on NutritionMD.org for more egg replacer suggestions. To cut back on some of the fat and calories, I also subbed half of the oil with unsweetened applesauce.

My cookies needed 8 minutes rather than the 7 indicated on the recipe.

The result? Pretty good cookies for only about 30 total minutes of work (prep through cleanup). They will certainly suffice for a sweet tooth.

Please note: On my first batch, I only slightly flattened the cookie balls, as the recipe indicates; however, they didn't spread or flatten much, and the insides were a bit underdone. For the second batch, I flattened them quite a bit myself before cooking. These ones came out with a better shape and the inside was finished. You can see the difference in the picture (first batch on left, second batch on right).

Now my tasks for the rest of the afternoon include 1) to actually get some work done, and 2) try not to eat all of the sugar cookies.

Monday, January 17, 2011

(No One Misses The) Cheese Vegan Pizza with Whole Wheat Crust

Time (from prep to cleanup): Just over an hour
Servings: This pizza would feed myself and my husband
Overall Score: 7.5

This recipe is actually my own (minus the whole wheat crust recipe, which you can find on About.com). I love the combination of sweet caramelized onions juxtaposed with slightly sour artichokes and spicy red pepper flakes.
I was all set to have some delicious pizza leftover from the Pat's game at my parents' house last night (boo to the Jets), but I opened the refrigerator to an empty shelf. Ryan had taken the leftovers to work.

After I got over my momentary burst of anger, I decided to make a new and better pizza for myself while he was stuck with cold day-old muck (okay, it wasn't muck...but making it sound bad makes me feel better).

What you'll need for the toppings:
  • 1 medium yellow onion
  • Olive oil
  • Splash of white wine
  • 1/2 red bell pepper, sliced
  • 1/2 yellow bell pepper, sliced
  • 4 oz. sliced mushrooms of choice (about 1/2 the average size package of mushrooms)
  • 1 can quartered artichoke hearts (you won't use them all, so get the smallest can you find)
  • 1 small can of tomato sauce (8 oz. is more than enough)
  • Dried basil, oregano, thyme and crushed red pepper flakes

Make the dough according to recipe first. It needs time to rise.

To caramelize the onion, slice it into thin rings. Heat a couple of tablespoons of oil in a frying pan on medium. Add the onions with a pinch of salt and a pinch of sugar. The key is to allow them to sit long enough to brown between stirring--if you stir too much, they won't brown. Watch them carefully to make sure they do not burn. Stir as necessary until the rings are soft and dark brown. Add a splash of white wine and cook long enough for it to evaporate. The onions are done. Note: there are various ways to caramelize onions; if you have a preferred alternative, feel free to use it.

Remove the onions from the pan and return it to the stove. Add more oil, if necessary, and saute the sliced peppers. Add the sliced mushrooms about half way through.

Now grab your dough (I let mine "rise" for about 30 minutes...but it didn't really change much). Stretch it into a circle on a pizza stone or a slightly oiled cookie sheet. Spread a layer of sauce over the dough. Sprinkle the sauce with the spices so that they are evenly distributed across the pizza. Add the caramelized onions, peppers, mushrooms and quartered artichokes. Bake on 425 degrees for 15 to 20 minutes (mine took the full 20 minutes).

Now, I am known to talk to myself sometimes, and the first words out of my mouth when I tried a bite of this pizza were literally "Wow, this is good!".  The only thing I would change is the crust thickness; I prefer my crust crispy, so I would stretch the dough a bit thinner next time. This is up to your personal tastes.

Apparently January 29 is Vegan Pizza Day, so I guess my recipe is surprisingly timely.

Stay tuned for my next review of Peta's Macadamia-Encrusted Seitan with Mango Broccoli Slaw.


P.S. I ate half of the pizza while writing this post.

Friday, January 14, 2011

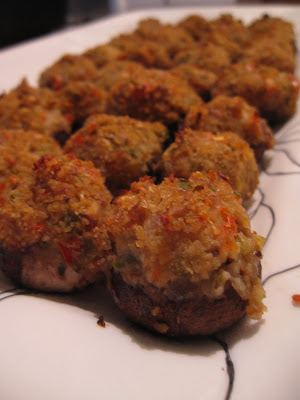
Stuffed Mushrooms from Hippy Gourmet

I don't typically like trying to follow a recipe from a video, but when I was first searching for a vegan stuffed mushroom recipe, Hippy Gourmet's version on YouTube seemed like the easiest recipe with the simplest ingredients.

To clarify what our Hippy uses in the video, the recipe calls for the following ingredients:
  • 1 Green Bell Pepper
  • 1 Red Bell Pepper
  • 1 Yellow Onion
  • 1 Red Onion
  • Several cloves of garlic (around 5)
  • Mushrooms (I used 3 10oz. packages of baby portabellas)
  • Fresh Oregano (I used dried as the stuff at my supermarket looked terrible)
  • Freshly Ground Pepper
  • Italian Bread Crumbs
  • Olive Oil (enough to saute the veggies in)
Because I like a little zing, I usually add some hot red pepper flakes. In addition, I find that about 1/4 teaspoon of salt really brings the flavor up to par (trust me on this one...I NEVER add salt, but it works here).

Because Hippy does not give us exact amounts on how many mushrooms to use, I came up a little short. The mixture could have easily filled another package of mushrooms. I therefore recommend that you buy at least 40 oz. of mushrooms, which should yield about 60 individual treats.

A note on the bread crumbs: most popular brands are not vegan. I found a gluten-free and vegan version by Gillian's Foods in the natural food section of the supermarket.

While this recipe is pretty simple, it is time fairly time consuming. From preparation through cleanup took me about an hour and 10 minutes. If you don't have a food processor, it will take longer.

Cleaning and de-stemming the mushrooms was the biggest time hog. My mother always taught me that mushrooms absorb water and therefore need to be cleaned with a wet cloth or paper towel rather than rinsed directly in water. What a pain! Make sure you have at least a half dozen paper towels available. As for the de-stemming, gently wiggle the stems to get them to pop neatly out of the mushroom caps.

Overall, Ryan and I love these mushrooms...but only with the added crushed red pepper flakes and salt. Otherwise, they are just plain bland. They are a bit of work for an everyday snack, but they make a great appetizer for a get-together with friends. We've made them several times now--they're a hit with both omnivores and veg-heads.

Enjoy!

Thursday, January 13, 2011

Red Lentil Thai Chili: Unexpected Combo

While I realize this meal seems, on the surface, very similar to the Rustic Winter Stew in my last post, I am a fan of all things Thai and decided I must try Post Punk Kitchen's Red Lentil Thai Chili. The author of the post said it was delicious and "blessedly easy", so why not?

Most ingredients in the recipe are common enough; however, those of you readers without an Asian market nearby may have trouble finding the Thai red curry paste and possibly the coconut milk. I actually had Thai green curry paste and coconut cream left over from a foray into Thai cooking after my trip to Southeast Asia in 2006. I substituted the green curry paste for the red and cut the coconut cream with water to make coconut milk.

In addition to these small changes, I also cut the vegetable both in half and used 2 cups of water to reduce the dish's sodium content (you'll find this to be a habit of mine).

Well, the unexpected combination of both curry and chili lived up to one of PPK's descriptions: delicious! The curry/chili is the perfect combination of both spicy and sweet--if you don't do well with spice, you might want to reduce the curry paste and/or increase the coconut milk. Pair the dish with some brown rice and a salad for a well-rounded, nutritious meal.

That said, the curry/chili was not exactly "blessedly easy". Fairly easy? Yes. However, preparation through cleanup lasted about an hour, with the vegetable chopping and dish washing as the most time-consuming. Preparing the rice and salad added another 10 to 15 minutes.

As stated on PPK's blog, this recipe prepare quite of bit of food...but I would certainly not say it's enough for 10 to 12 servings. As a main dish for hearty eaters, this dish would serve 4 at most.

Overall, I'd rate this the Red Lentil Thai Chili recipe as an 8.

Stay tuned for my next review of Hippy Gourmet's Vegan Stuffed Mushrooms.

Wednesday, January 12, 2011

PPK's Rustic Winter Stew (Over Polenta?)

As the snow raged in New Hampshire today, nothing sounded mor  e appetizing for dinner than Post  Punk Kitchen's Rustic Winter Stew Over Polenta. My husband Ryan and I thoroughly enjoyed the hearty, warm dish, with a few changes from the original recipe.

While Ryan was gracious enough to brave the blizzard to do our food run, he could not find the polenta and did not buy the celery seed (he seems to think I have too many spices--impossible!). This necessitated a few small changes to the recipe: we ate our stew over brown rice and  omitted the celery seed. In addition, while the recipe calls for 2 bay leaves, it never says when to add them; I therefore forgot to add them at all. Finally, I cut the vegetable stock in half and added 2 cups of water instead to cut down on the sodium.

The result? Ryan and I both happily ate the well-rounded, whole meal. It was slightly bland, which I attribute to cutting out the celery seed, some of the veggie stock, and the seasoned polenta. Perhaps adding a bit more thyme, salt and pepper, as well as a hint of spice (red pepper flakes? cayenne pepper?) would fill out the flavor.

As for servings, this recipe fed us both well (we have big appetites) with a 2-cup serving left over for lunch tomorrow.

Overall, I'd rate my version of this recipe at 6 out of 10. Healthy, well-rounded, filling, fairly inexpensive...but needing a little more pop.